Making music on the internet
A Home Brew ‘JamJar’ by REB Holland
Updated 2 March 2021
The link to the Downloadable/Printable PDF version of this guide may be found by scrolling down to the bottom of this page.
This is a very basic build up of a Raspberry Pi 4 Model B (RPi) for use with JackTrip VirtualStudio software.
It is written to help get you up and running and making music on the internet together quickly, easily and cheaply at a typical build cost of around £80 (plus microphone & headphones). The same hardware can also be used with other software systems such as Jamulus and SonoBus but these are not described here.
For want of a working title I’ve called the complete system my JamJar (as in “a container for jamming”) and recently built up three of these in an hour or so on my kitchen table.
The JackTrip VirtualStudio device was released as a pre-built product late in 2020 and allows you to play music over the internet with other people at CD quality. The JamJar is based on this but uses lower cost widely available hardware.
So here’s how to make music together again...
First you will need a good broadband internet connection (download/upload speed both better than 2Mb) to make this work and you must also know what your router looks like and where it is.
This will NOT work with a WiFi connection - so don’t bother trying!
This is now working very well for a group of musicians in and around the Dinnington area - that’s the one in South Yorkshire, England - but it will work well over much longer distances too.
I’m writing a more detailed document aimed at amateur musicians or singers in the UK working in small or large groups who want some help to figure out whether this is worthwhile for them. This will include a guide to self-assessment, details of a small pilot scheme (based on what is described here), some case studies and topics for further reading. It is at the draft stage right now but let me know privately if you’re interested in reading this.
The most important thing to say at this stage is that you really do not need to know about the JackTrip technology behind all this in order to use it.
The second most important thing I’d say about this is that if you think you already know about the technology then for the time being set that knowledge aside and do not try to use your existing computer. It may work well for you (it did for me on macOS, Windows and Linux), but there are more variables in play and you’ll also have to learn how to use JackTrip on a computer since the simple web based JackTrip VirtualStudio user interface will not be available.
Furthermore, the recommended Raspberry Pi module on which the JamJar is based will cost you around £50 so that’s the most money you are likely to save. If later you do decide to use your computer for JackTrip then the RPi will have a decent resale value or alternative use.
Unless you really want to do some fancy stuff (like on-line recording and production) the VirtualStudio approach will work just fine for people in choirs, bands and orchestras who simply want to connect a microphone, instrument and headphones, switch on and then play or sing together and hear everyone else as they do so. That’s how I’m using it and that’s what is needed during the current pandemic.
Before you go any further
It’s worth testing your internet connection from where you intend to play using MusiciansTogetherApart. Choose the nearest location to you in the first instance but check out some less obvious ones too as you may find you are able to play together over some significant distances.
Make sure when you do this that you are connected directly to your router and not via WiFi otherwise you will get misleading results. If you can’t connect directly to your router at present then ask someone with whom you’ll want to play to try.
Here’s a picture of the back of a typical router in case you are unsure - you’ll need to connect directly to one of the ports marked Gig Ethernet or the equivalent to perform this test.

Example results from my connection to London and Frankfurt are shown below...
Example 1:

Example 2:

If this doesn’t work out well for you then you’ll probably need to change your internet connection, but that’s beyond the scope of this document.
To DIY or Buy?
The most recent JackTrip VirtualStudio software (released on 14 Feb 2021) will work with almost all USB audio interfaces so if you have one of these already that’s a good starting point and it may be worth looking at whether this has been used by others by checking this list of supported sound cards.
If you don’t know or care what a USB audio interface is and just want to make music together then just read on and follow the instructions, deciding later whether you want to DIY or Buy.
Preferred DIY JamJar setup for ease of use
This is based on a RaspberryPi 4B and the Behringer U-PHORIA UM2 audio interface.
I’ve recently tested the UM2 which at the time of writing is available in the UK from Amazon at £29.99. [For the avoidance of doubt I’ve no interest in either.]
This is slightly slower than the pre-built reference Jacktrip VirtualStudio device, but I measured a difference of only 3ms in loopback audio tests. This is excellent unless your own internet connection proves to be slow on the ping test compared with the rest of your group. Using the faster HiFiBerry card as used in the pre-built device might then make a difference to the tempo of music you can play together.
The UM2 provides a Microphone input (including +48V phantom voltage for condenser mics) on a combi-jack, a second instrument input on a ¼” jack and a stereo headphone output jack (also ¼”). It has a direct input monitoring switch (you’ll need this), level controls and stereo line outputs (to drive an amplifier & speakers.
Watch out for acoustic feedback if you’re using speakers and a microphone, and note that the people you are playing with will probably hear this as reverb or echo.
This combination should suit most solo (mono) instruments and vocals. If you want to do anything more complicated such as drum kits and keyboards, or have several people playing or singing from the same location, then I’d consider adding a simple stereo output analog mixer in front of this to meet your needs - there are plenty of these available from around £30. Connect the mixer’s outputs to the UM2’s inputs.
There are some alternative USB audio interfaces available from about £20, but the UM2 is much more convenient, fast and represents good value.
The other things you will need are...
- Raspberry Pi 4B with 2GB Ram. About £39. You can use 4Gb or 8Gb models too, but they are more expensive and are not required.
- A Raspberry Pi 4 power supply (about £10).
- A micro-SD memory card (Class 10, 16GB minimum). About £5.
- A plastic case for the Raspberry Pi. About £3 upwards.
- A small screwdriver.
- A RJ45 network patch cable to connect to your router (£1 per metre).
- Velcro sticky pads as required - the RPi tends to move around once it gets a few cables attached. I have mine stuck on the side of a bookcase.
You can buy RaspberryPi starter kits as a bundle - check what they include as you may get a much better deal than the individual items listed above.
1. Gather everything together on a suitable assembly surface.

2. Remove the Raspberry Pi module from its box and read the instruction leaflet, noting the warning about not touching pins.
Here’s a suggestion to RPi - might it be better if the leaflet were packed on top?

3. Take your plastic box & carefully position the RPi board in its base.
Secure this in place with four 2.5mm screws (or spacers, depending on your box).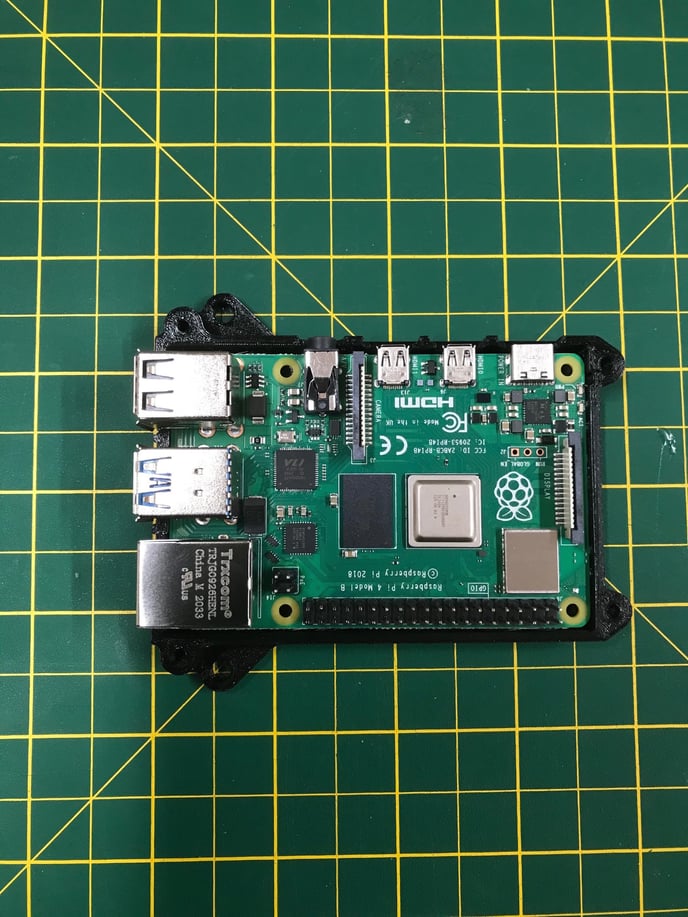
4. Now put the lid on the box and secure this in place with four 2.5mm screws.

5. Now grab your micro-SD memory card.
You’ll need to program this yourself using an SD Card reader using software such as Balena Etcher or ask someone to do it for you and buy them a pint.
https://www.balena.io/etcher/?
The required file can be obtained from the JackTrip Foundation
Download the latest image .zip file and use Balena Etcher to copy it to your card.
This only takes a few minutes.

6. Once programmed and verified, carefully insert the micro-SD card in the slot at one end of the Raspberry Pi module (the opposite end to the group of USB connectors).

7. Grab your power supply and connect its USB C connector to the RPi as shown.

8. Now take your RJ45 network patch cable - this must be long enough to reach your internet router box.

9. Plug one end of the cable into the RPi as shown, and plug the other end into your router.
It’s at this point you’ll probably want to apply some Velcro sticky pads to the base of the box to help keep it in one place.

10. Now connect your USB Audio interface to one of the RPi’s four USB ports. The blue ones are USB 3.0 spec so use one of these if in doubt.
Once this is all set up you’re about ready to switch on and register the device with the JackTrip Foundation.
The first time you switch on leave the unit for a few minutes to perform any updates required.
Now follow these instructions from Step 3: Registering and connecting onwards, noting that these have been written for the pre-built VirtualStudio box - you’ll have to use the controls on your USB interface instead.
Using a Raspberry Pi400
The new Raspberry Pi400 is available from around £65 or as a complete kit for a little more. This is essentially a Raspberry Pi 4B combined with a keyboard as a single unit.
You’ll need a Pi4 power supply and micro SD card too, but when used with a UM2 audio interface this is a very neat solution which you can also use as a general purpose computer outside your music making sessions - just plug it into a TV (HDMI cable required) and add a USB mouse.

All you need to do is program the micro-SD card with the same zip file (see earlier), connect the power supply, network cable and USB audio interface and you’re good to go - just follow the final steps above re switching on and registration.
Note that you don’t need to use any display, mouse or keyboard to use the pi400 with Jacktrip VirtualStudio software.
[Should you be interested in helping to develop or customize the technology behind JackTrip and VirtualStudio then you can use the Pi400 to work on the open source software it uses.]

Buying the pre-built VirtualStudio
If you don’t like the DIY approach described earlier then you can buy a finished JackTrip VirtualStudiobox (which incorporates the audio interface) on Amazon. Lead times on the finished units might be long in the UK as demand has increased recently.
I have one of these VirtualStudio boxes connected to my mixing desk. It works extremely well in that situation but in my opinion is neither cost effective nor convenient for the beginner to use. In particular...
- It is not straightforward to connect to microphones using standard cables;
- There is no phantom voltage (+48V) for condenser mics. Electret mics can be accommodated with difficulty;
- It has no direct connection for headphones and no built-in headphone amplifier - just line level phono outputs;
- There is no direct input monitoring facility - required in most cases;
- There are no local level controls for either input or output - it relies instead on a web interface which requires an additional device such as a smartphone, tablet or computer to control which may prove difficult for some people;
- It is relatively expensive to buy (currently $150). The (RPi + UM2) JamJar self build by contrast will cost around £80 complete.
The pre-built VirtualStudio unit must always be used with additional equipment such as an audio mixer and/or cable adapters, and a web browser on another device.
You may find some advantages in using the pre-built device at a later date, and to be fair there are some interesting developments currently taking place. If these prove to be useful then you can very easily add the HiFiBerry ‘hat’ interface to your RPi yourself to achieve the same end.
Choosing a JackTrip server
Once you’re up and running with this you’ll need to agree with your friends on how you’re going to choose a suitable JackTrip server for your group. There are several choices available to you…
- Musicians Together Apart is a commercial service operating globally.
- JackTrip Foundation is now making available commercial servers for use with JackTrip VirtualStudio around the world. Checkout the reduced pricing for charitable & not-for-profit groups.
- Run your own unmanaged server if you have the skills to do this, either in the cloud or on your own network. I use a cloud service called Linode which gives me good performance from my Sheffield base, but I also run a server for test purposes on my own private network (actually this server runs on another Raspberry Pi 4B).
Using (1) or (2) will probably be the best choice for most people, but (3) can be significantly cheaper to run if you have the skills required. There is a very helpful document available here…
Setting up a JackTrip server on Linode